一、前言
前一段时间彩云小译上了App Store的推荐,我下载试玩了一下,效果还是非常不错的。它可以实现实时翻译的功能,我自己粗浅地分析了一下彩云小译的实现原理,其中最重要的一步就是声音转文字。
目前市面上也有很多服务商提供声音转文字的服务,有收费的有免费的,但是毕竟是第三方的服务商,接口的性能和稳定性都不一定能保证。
2016年Apple在发布重磅产品iOS10的同时也发布了Speech Kit语音识别框架,大名鼎鼎的Siri的语音识别就是基于Speech Kit实现的。有了Speech Kit,我们就可以非常简单地实现声音转文字的功能。下面我就简单介绍一下Speech Kit的用法。
二、实现
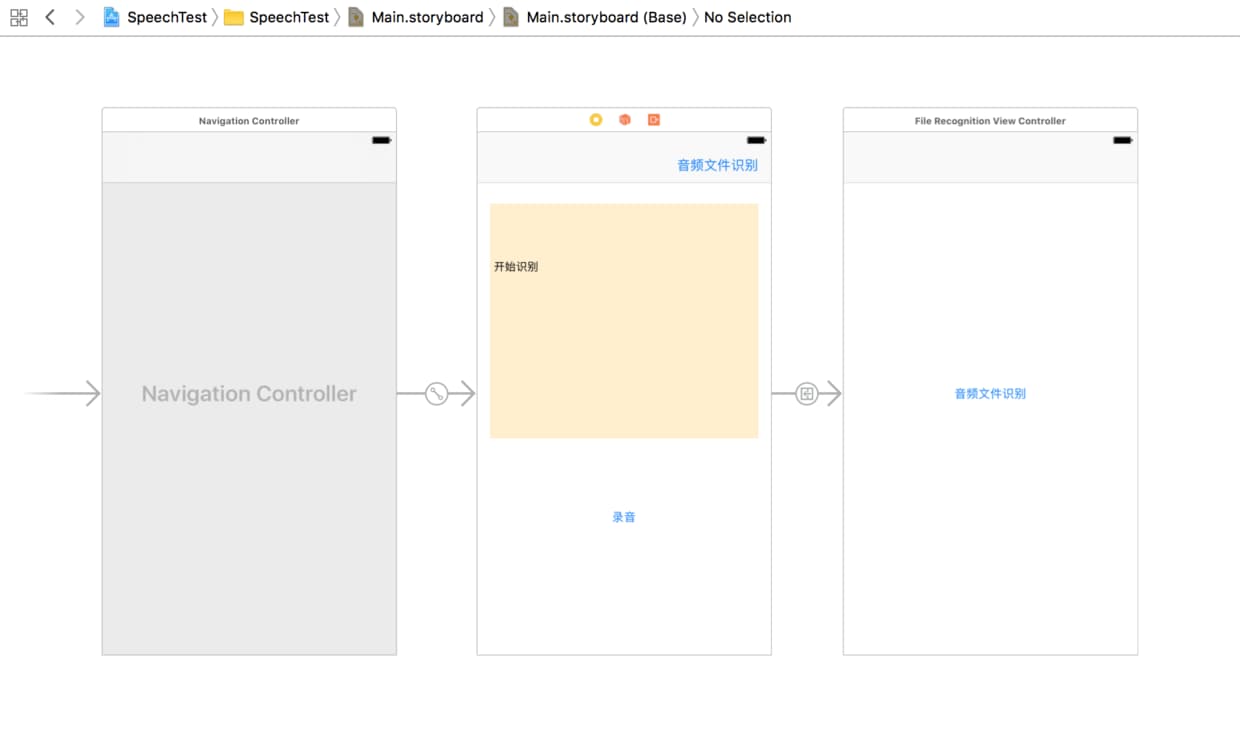
1、页面布局
因为只是实现一个Demo,页面不需要多复杂,只需要在Storyboard上拖入两个控件:一个UITextView用于展示声音转文字的结果,一个UIButton用于触发语音识别,最好布置好约束即可。具体效果如下图:
2、申请用户权限
首先需要引入Speech Kit框架
#import <Speech/Speech.h>
申请权限非常简单,在识别前(viewDidLoad:)加入以下代码即可申请语音识别的权限:
- (void)viewDidLoad {
    [super viewDidLoad];

    // 请求权限
    [SFSpeechRecognizer requestAuthorization:^(SFSpeechRecognizerAuthorizationStatus status) {
        NSLog(@"status %@", status == SFSpeechRecognizerAuthorizationStatusAuthorized ? @"授权成功" : @"授权失败");
    }];
}
这时候运行起来会崩溃,原因是在iOS10后需要在info.plist文件中添加麦克分和语音识别权限申请信息:
<key>NSSpeechRecognitionUsageDescription</key>
<string>请允许语音识别</string>
<key>NSMicrophoneUsageDescription</key>
<string>请打开麦克风</string>
运行项目,会提示打开语音识别和打开麦克风权限,至此我们已经完成了权限的申请。
3、初始化语音识别引擎
添加以下代码:
- (void)initEngine {
    if (!self.speechRecognizer) {
        // 设置语言
        NSLocale *locale = [NSLocale localeWithLocaleIdentifier:@"zh-CN"];
        self.speechRecognizer = [[SFSpeechRecognizer alloc] initWithLocale:locale];
    }
    if (!self.audioEngine) {
        self.audioEngine = [[AVAudioEngine alloc] init];
    }

    AVAudioSession *audioSession = [AVAudioSession sharedInstance];
    [audioSession setCategory:AVAudioSessionCategoryRecord mode:AVAudioSessionModeMeasurement options:AVAudioSessionCategoryOptionDuckOthers error:nil];
    [audioSession setActive:YES withOptions:AVAudioSessionSetActiveOptionNotifyOthersOnDeactivation error:nil];

    if (self.recognitionRequest) {
        [self.recognitionRequest endAudio];
        self.recognitionRequest = nil;
    }
    self.recognitionRequest = [[SFSpeechAudioBufferRecognitionRequest alloc] init];
    self.recognitionRequest.shouldReportPartialResults = YES;
}
- 初始化
SFSpeechRecognizer时需要传入一个NSLocle对象,用于标识用户输入的语种,如"zh-CN"代表普通话,“en_US"代表英文。 AVAudioEngine是音频引擎,用于音频输入。- 利用
AVAudioSession对象进行音频录制的配置。 - 在语音识别产生最终结果之前可能产生多种结果,设置
SFSpeechAudioBufferRecognitionRequest对象的shouldReportPartialResult属性为YES意味着每产生一种结果就马上返回。
4、启动语音识别引擎
添加以下代码:
- (void)startRecording:(UIButton *)recordButton {
    [self initEngine];

    AVAudioFormat *recordingFormat = [[self.audioEngine inputNode] outputFormatForBus:0];
    [[self.audioEngine inputNode] installTapOnBus:0 bufferSize:1024 format:recordingFormat block:^(AVAudioPCMBuffer * _Nonnull buffer, AVAudioTime * _Nonnull when) {
        [self.recognitionRequest appendAudioPCMBuffer:buffer];
    }];
    [self.audioEngine prepare];
    [self.audioEngine startAndReturnError:nil];

    [recordButton setTitle:@"录音ing" forState:UIControlStateNormal];
}
- 为
self.recordButton添加点击事件。 - 设置音频录制的格式及音频流回调的处理(把音频流拼接到
self.recognitionRequest)。 - 开始录制音频。
- 修改按钮文案。
5、重置语音识别引擎
添加以下代码:
- (void)stopRecording:(UIButton *)recordButton {
    [[self.audioEngine inputNode] removeTapOnBus:0];
    [self.audioEngine stop];

    [self.recognitionRequest endAudio];
    self.recognitionRequest = nil;

    [recordButton setTitle:@"录音" forState:UIControlStateNormal];
}
- 为
self.recordButton添加点击事件。 - 停止音频录制引擎。
- 停止识别器。
- 修改按钮文案。
6、语音识别结果的回调
下面是语音识别器SFSpeechRecognizer的API描述:
// Recognize speech utterance with a request
// If request.shouldReportPartialResults is true, result handler will be called
// repeatedly with partial results, then finally with a final result or an error.
- (SFSpeechRecognitionTask *)recognitionTaskWithRequest:(SFSpeechRecognitionRequest *)request
                                          resultHandler:(void (^)(SFSpeechRecognitionResult * __nullable result, NSError * __nullable error))resultHandler;

// Advanced API: Recognize a custom request with with a delegate
// The delegate will be weakly referenced by the returned task
- (SFSpeechRecognitionTask *)recognitionTaskWithRequest:(SFSpeechRecognitionRequest *)request
                                               delegate:(id <SFSpeechRecognitionTaskDelegate>)delegate;
语音识别结果的回调有两种方式,一种是delegate,一种是block,这里为了简单,先采用block的方式回调。
初始化语音识别器SFSpeechRecognizer时添加以下代码:
[self.speechRecognizer recognitionTaskWithRequest:self.recognitionRequest resultHandler:^(SFSpeechRecognitionResult * _Nullable result, NSError * _Nullable error) {
        NSLog(@"is final: %d  result: %@", result.isFinal, result.bestTranscription.formattedString);
        if (result.isFinal) {
            self.textView.text = [NSString stringWithFormat:@"%@%@", self.textView.text, result.bestTranscription.formattedString];
        }
    }];
7、识别音频文件
添加以下代码
- (IBAction)startRecognizing:(id)sender {
    SFSpeechRecognizer *recognizer = [[SFSpeechRecognizer alloc] initWithLocale:[NSLocale localeWithLocaleIdentifier:@"zh_CN"]];
    NSURL *url = [[NSBundle mainBundle] URLForResource:@"test.mp3" withExtension:nil];
    SFSpeechURLRecognitionRequest *request = [[SFSpeechURLRecognitionRequest alloc] initWithURL:url];
    [recognizer recognitionTaskWithRequest:request resultHandler:^(SFSpeechRecognitionResult * _Nullable result, NSError * _Nullable error) {
        if (result.isFinal) {
            UIAlertController *alert = [UIAlertController alertControllerWithTitle:@"识别结果" message:[NSString stringWithFormat:@"%@", result.bestTranscription.formattedString] preferredStyle:UIAlertControllerStyleAlert];
            UIAlertAction *confirm = [UIAlertAction actionWithTitle:@"OK" style:UIAlertActionStyleCancel handler:nil];
            [alert addAction:confirm];
            [self presentViewController:alert animated:YES completion:nil];
        }
    }];
}
- 初始化语音识别器
SFSpeechRecognizer。 - 获取音频文件路径。
- 初始化语音识别请求
SFSpeechURLRecognitionRequest。 - 设置回调。
三、总结
本文章主要介绍了如何利用iOS系统自带的Speech Kit框架实现音频转文字的功能,Speech Kit相当强大,本文章只是非常简单的介绍了录音识别及音频文件识别而已,大家有兴趣可以深入研究,有问题也可以一起探讨。
声音转文字的功能我们已经实现了,下一步我们可以找到翻译服务提供商的服务,就可以实现一个简易版的实时翻译应用了。
本文Demo:https://github.com/OuDuShu/SpeechTest
四、参考
http://swift.gg/2016/09/30/siri-speech-framework/ https://developer.apple.com/videos/play/wwdc2016/509/ https://developer.nuance.com/public/Help/DragonMobileSDKReference_iOS/Getting-started.html https://www.raywenderlich.com/60870/building-ios-app-like-siri